Night and Day -
Paper Piecing
The block "Night and Day" comes from the book Farmer's Wife Sampler Quilt, but with a few (necessary) modifications. In case you google the book, you may be interested in knowing the blocks and templates included on a CD in the book are all designed to produce six inch blocks. If you're still interested in this book, you should definitely know you should NOT use their templates to put THIS block together. After a little blog digging, I have seen many beautiful blocks that have been assembled using the templates provided on the CD. I cannot wait to try them when my list of to-do's shrink.

We will assemble this block using the paper piecing method.
The color assignments are Royal Blue and Bright Yellow. You will be given the Royal Blue fabric. You will need to secure 1/4 yard of bright yellow print fabric. It may include a little white and/or a little royal blue.
You will be given:
- 1/4 yard of Royal Blue fabric
- 3 templates for cutting your fabric
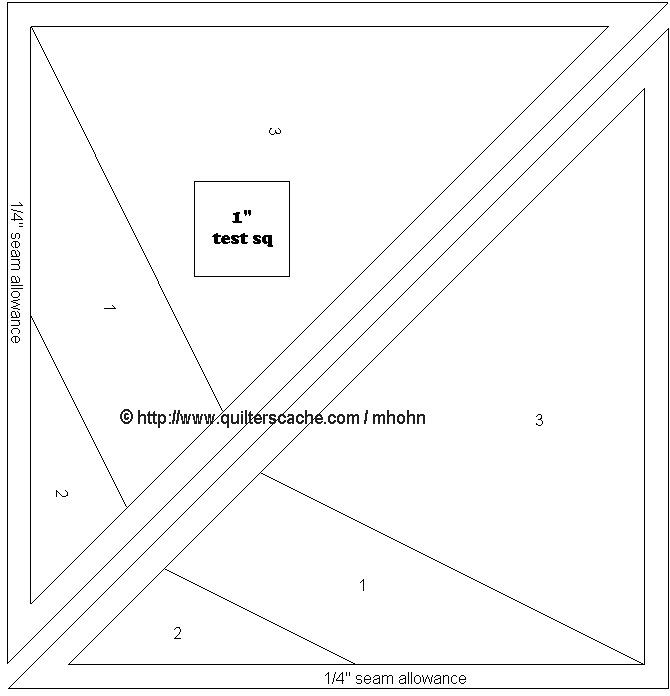
- 4 sheets of Triangle shaped Paper Piecing templates (printed on tracing paper) - These are printed from the web page http://quilterscache.com/images17/nightanddaytemps.gif The website quilterscache.com has so many block ideas and templates. Check it out.
Mark your calendars: March 12th - 10:00am - Night and Day Assembly at Jennifer R's house!!! If you need assistance or want to just hang, bring your fabric and templates and we'll work your block together! We'll try to do it again one day the last week of March, date to be determined.
I will provide some detailed steps below. Let's get this party started. (This Jennifer btw, I'm posting this for my mom, Vee.)
In your package, you will be given a quilting plastic template page that has three templates traced on it. Cut them out, leaving enough black line so that you easily see the edge of your template.
BEFORE CUTTING YOUR FABRIC, please note how to lay your fabric out so that all pieces are cut out the correct way. You will put your 1/4 yard YELLOW FABRIC right side UP on your cutting mat. Then lay the Royal Blue fabric right side DOWN (Down) (I said DOWN) =) You will now be looking at the back side of your blue fabric that is on top of the yellow fabric, as identified in the picture below.
 |
| When positioning fabric for cutting from templates, lay your YELLOW FABRIC on BOTTOM and your BLUE FABRIC on TOP (RIGHT SIDES TOGETHER) |
 |
| Use a rolled up piece of scotch tape to keep your template from moving under your ruler. Trust me, don't skip this. |
 |
| Notice the Ruler. Notice the fabric right sides together. =) |
Take your tracing paper sheets. Cut out your eight triangles. Notice there are three numbered sections to each triangle. Each section is marked with a number and the word LIGHT (which means yellow) or DARK (which means blue).
 |
| You will trim the excess fabric and triangle away after your three parts are sewn on LATER. So don't worry about cutting close to the black line here. |
 |
| The Light fabric #1 is in position on the back of the template. |
 |
| Another view of fabric #1 in position on the back side of your template. We use tape here. |
 |
| This is the million dollar example here. Your fabric #2 is right side down and the edge of your fabrics are lined up. |
 |
| Sew from EDGE of triangle to EDGE of triangle across this one seam ONLY. In other words, do not stop sewing at the inside triangle. You should reduce the stitch length to 2mm. This will ease in the removal of the paper later. Backstitching at the beginning and end of the seam will also be useful in keeping the seam in tact while removing the paper. |
 |
| This is fabric #3 right side down but lined up with fabric #1. It is pinned in place. |
 |
| FLIP then sew across this seam ONLY. |
 |
| Again, sew from one edge of triangle to the other edge across this one seam ONLY. |
 |
| Trimmed |
 |
| Flipped over and paired up. |
 |
| Carefully, tear away the paper template after your trimming is done. |
 |
| Assemble your Quarters together using a 1/4 inch seam. Then assemble the top two quarters, the bottom two, and then the top and bottom half. |
|
| Night and Day |
Read through this tutorial. If there are any obvious holes, please let me know. There were probably at least 150 distractions during the creation of this tute. Happy Sewing!
5 comments:
This is really beautiful! I am excited to try a new technique.
I babysit my granddaughter on Mondays. Are children discouraged? I may try to see if I can make other arrangements.
That makes it sound like I said something I shouldn't have... I just had posted the same thing twice!
Mardie, children are not discouraged. I have a 3 1/2 yr old and an almost 2 yr old. ... How old is she? I suppose if she is a pre-crawler you should dress her in armor to survive my wild duo. ;)
My granddaughter is 3 1/2. I will let you know if she will be coming. Thanks for inviting her!
Post a Comment