Friday, March 30, 2012
Night and Day Block
I loved doing the Night and Day Star for Vanitta. It was a little intimidating at first because I had never done paper piecing, but it turned out great. It is really a good way to match up odd angles. They just fit together perfect.
Tuesday, March 20, 2012
My Star for Vee


It was fun to do a technique that I had never done before. Great job with the tutorial, the directions were precise and had all of the information I needed.
I hope you like it, Vee. I enjoyed sewing it!
Friday, March 16, 2012

Thursday, March 15, 2012
Sew Beauty-ful


Wednesday, March 7, 2012

Circles....in time.
There are 2 GREAT ways to get a perfect center circle for your Dresden. The first method is using a used dryer sheet The second a cardboard circle.
#1 Dryer sheet


.jpg) |
| Trace your template on the used dryer sheet. (NO seam allowances.) |
.jpg) |
| Place on RIGHT side of fabric and stitch with a smaller 2mm stitch length ON THE LINE. Trim to 1/8". |
.jpg) |
| Separate the two layers and make a snip large enough to turn the fabric through. |
.jpg)
.jpg) |
| The bud is forming into a beautiful flower center. |
.jpg) |
| A center is born! Now put your finger inside and finger press all the way around. Take it to the iron and press it from the fabric side. |

 |
| GUESTAMATE a 1/4" seam allowance all the way around and cut on that line. |
 |
| Use the old needle and thread trick to make a gathering stitch all the way around this bad boy. |
 |
| Turn the RIGHT side of the fabric DOWN and place the cardboard template on the WRONG side of the fabric. |
 |
| pull the two ends of your gathering stitch and secure with a knot or stitch, or both. |


 |
| Now carefully take that fancy cardboard out. |
 |
| Viola' |
 |
| Here are the two methods back sides side by side so you can compare. |
 |
| Here is their "better" side. The top one is the cardboard template the bottom is the dryer sheet. |
 |
| Secure with pins and sew it down. You can use a decorative stitch, zig zag or straight. If straight I would use a longer stitch length. I LOVE using shinny thread. |
.jpg)

Sherrie's Bio and completed blocks-
Sherrie's Bio
The first picture is of my sister, Sherrie Torgerson. She lives in Dardanelle, AR. She was so sweet to join our quilting group when I shared with her that we were going to need to fill some vacancies this year. She's a busy girl. She works part time for a book distributing company and finds herself traveling many days a week to visit public school libraries across many counties in Arkansas. She usually holds a couple of callings at the Danville Branch in the North Little Rock stake. Their branch has just celebrated their 20 year anniversary. She and her hubby have played an integral part in the existence of that branch since the first meeting or before! She has her last baby, who's 16, still at home. February has been an exciting month for her. She has welcomed her 4th grand baby into the world. Her daughter, Genevieve, had her first child. She named him Eric, after a son Sherrie lost to cancer in 2000. Sherrie is mother to 5, including that special Eric who we will see again when we cross the veil. Her hubby surprised her with a new brother sewing machine at Christmas (what a good man!). She has forever sewn, making her kids pj's, costumes, etc. Having said that she, like the rest of us, feels like she has much to learn from this quilting bee. But, look at her first two squares! They are beautiful....
Just like my sis!
 |
| Sherrie and her Dresden Plate for Jennifer S. |
 |
 |
| Sherrie's Christmas Tree block for Marnita Vee's March Block |
Night and Day
Mom's block was SO fun! And it was quite easy to put together after a few minutes of study! Mardie and Sherrie D., your fabric and templates were put into the mail yesterday. Please let me know if you don't see them by the weekend.
 |
| Jennifer R's Block |
 |
| Mom's Block |
Hope you are all enjoying this as much as I am! Don't forget to try to come over to my house the morning of the 12th. Sherrie D.- I know you are a busy momma! But, if you find yourself needing a road trip from Iowa, you are welcome to stay with me! Ladies, please don't forget your paper templates and both fabrics. Oh- I thought I may provide some Chicken Salad Croissants for us to snack on. If you'd like to bring something, i.e. fruit or something you may, but you don't have to!
Tuesday, March 6, 2012
Star Light Star Dark

Here is a closeup of the fabric.

I am so glad I got to do this square and learn something new. It's fun to discover new things and find out that you really like them!
Monday, March 5, 2012
Yummy Yummy Quilts by Julie, square by Emily S.
Prepare to gasp in awe and delishiousness. These are a few of my favorite things.
.jpg)
.jpg)

.jpg)
.jpg) |
| Inscription: "Jennifer, The sister I never had. Twenty-eleven. Love Julie." I am soooo blessed to have Julie as my sister. |
.jpg) |
| Isn't this pattern gorgeous! Dainty, modern, timeless. Thank you Julie!!!!! Julie has a long-arm Gammel and has the best prices in the country for quilting. Email her for info today. |
.jpg) |
| Sooo fun. I remember going to the fabric store with Julie and picking out my "someday I'll make a quilt out of these yummy fabrics while HUGE pregnant with Joseph." -Little did I know. |
.jpg) |
| Chocolate and caramel too! |
.jpg) |
| SEW fell in LOVE with this print and style of quilting. Thank heaven for friends and sisters. I have both all in one. |
.jpg) |
| Merry Christmas. Twenty-eleven. Love, Julie |
.jpg)
.jpg)
.jpg)
 |
| Emily S. This is beautiful!!!! Or should I say Bloom-a-ful! Thank You! |

Friday, March 2, 2012
Night and Day the non-Farmer's Wife Way!
Night and Day -
Paper Piecing
The block "Night and Day" comes from the book Farmer's Wife Sampler Quilt, but with a few (necessary) modifications. In case you google the book, you may be interested in knowing the blocks and templates included on a CD in the book are all designed to produce six inch blocks. If you're still interested in this book, you should definitely know you should NOT use their templates to put THIS block together. After a little blog digging, I have seen many beautiful blocks that have been assembled using the templates provided on the CD. I cannot wait to try them when my list of to-do's shrink.

We will assemble this block using the paper piecing method.
The color assignments are Royal Blue and Bright Yellow. You will be given the Royal Blue fabric. You will need to secure 1/4 yard of bright yellow print fabric. It may include a little white and/or a little royal blue.
You will be given:
- 1/4 yard of Royal Blue fabric
- 3 templates for cutting your fabric
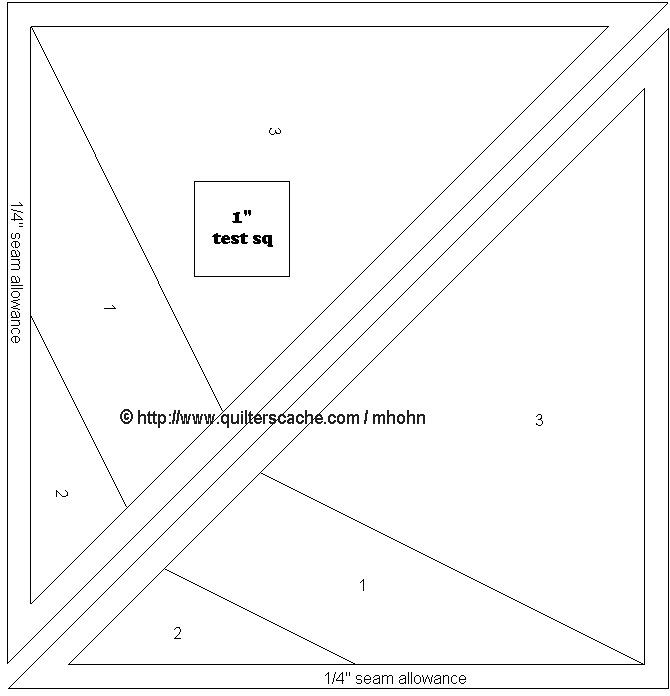
- 4 sheets of Triangle shaped Paper Piecing templates (printed on tracing paper) - These are printed from the web page http://quilterscache.com/images17/nightanddaytemps.gif The website quilterscache.com has so many block ideas and templates. Check it out.
Mark your calendars: March 12th - 10:00am - Night and Day Assembly at Jennifer R's house!!! If you need assistance or want to just hang, bring your fabric and templates and we'll work your block together! We'll try to do it again one day the last week of March, date to be determined.
I will provide some detailed steps below. Let's get this party started. (This Jennifer btw, I'm posting this for my mom, Vee.)
In your package, you will be given a quilting plastic template page that has three templates traced on it. Cut them out, leaving enough black line so that you easily see the edge of your template.
BEFORE CUTTING YOUR FABRIC, please note how to lay your fabric out so that all pieces are cut out the correct way. You will put your 1/4 yard YELLOW FABRIC right side UP on your cutting mat. Then lay the Royal Blue fabric right side DOWN (Down) (I said DOWN) =) You will now be looking at the back side of your blue fabric that is on top of the yellow fabric, as identified in the picture below.
 |
| When positioning fabric for cutting from templates, lay your YELLOW FABRIC on BOTTOM and your BLUE FABRIC on TOP (RIGHT SIDES TOGETHER) |
 |
| Use a rolled up piece of scotch tape to keep your template from moving under your ruler. Trust me, don't skip this. |
 |
| Notice the Ruler. Notice the fabric right sides together. =) |
Take your tracing paper sheets. Cut out your eight triangles. Notice there are three numbered sections to each triangle. Each section is marked with a number and the word LIGHT (which means yellow) or DARK (which means blue).
 |
| You will trim the excess fabric and triangle away after your three parts are sewn on LATER. So don't worry about cutting close to the black line here. |
 |
| The Light fabric #1 is in position on the back of the template. |
 |
| Another view of fabric #1 in position on the back side of your template. We use tape here. |
 |
| This is the million dollar example here. Your fabric #2 is right side down and the edge of your fabrics are lined up. |
 |
| Sew from EDGE of triangle to EDGE of triangle across this one seam ONLY. In other words, do not stop sewing at the inside triangle. You should reduce the stitch length to 2mm. This will ease in the removal of the paper later. Backstitching at the beginning and end of the seam will also be useful in keeping the seam in tact while removing the paper. |
 |
| This is fabric #3 right side down but lined up with fabric #1. It is pinned in place. |
 |
| FLIP then sew across this seam ONLY. |
 |
| Again, sew from one edge of triangle to the other edge across this one seam ONLY. |
 |
| Trimmed |
 |
| Flipped over and paired up. |
 |
| Carefully, tear away the paper template after your trimming is done. |
 |
| Assemble your Quarters together using a 1/4 inch seam. Then assemble the top two quarters, the bottom two, and then the top and bottom half. |
|
| Night and Day |
Read through this tutorial. If there are any obvious holes, please let me know. There were probably at least 150 distractions during the creation of this tute. Happy Sewing!
Subscribe to:
Posts (Atom)