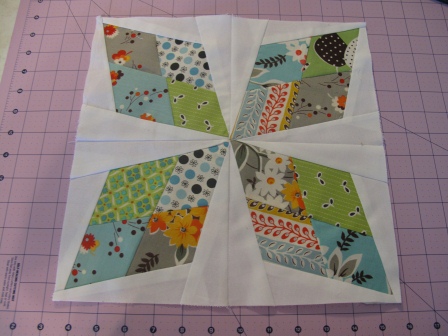
Hello Ladies!! I have traded months with Sally B. so I will be providing the instructions for June. I found my inspiration while blog hopping......Once I found the block I wanted to make I saved it for the future post. We will be combining regular piecing with paper piecing in order to create "The Arkansas Traveler" block!!! Here is the
blog where the orginal post is. You will also find the original directions for sewing the block in case mine are too confusing.
I am sending you fabric strips (2 5/8" x 9"). You will have 8 of these strips. You will be responsible for the background fabric. PLEASE USE KONA WHITE for the background pieces. From the KONA White you will cut eight 3" x 6" strips AND eight 3" by 9" strips.
(I normally keep a couple of yards of Kona White in my stash so I have them ready for blocks that require them).
1. Place your ruler on an angle over the end of one of the 2 5/8" x 9" strips, lining up the 60-degrees mark with the bottom of the strip, as shown and then cut. (My large cutting guide shown below has the degree markings - the bottom of the strip is aligned with the 60-degree line).
2. Slide your ruler over. With the 60-degree mark still lined up with the bottom of the strip, line up the 2 5/8" mark on your ruler with the angled (cut) end of the strip, and cut again.
3. You have a 60-degree diamond. Now continue cutting the diamonds from your fabric strips (colored strips not white strips) until you have 16 diamonds.
4. Pair up two diamonds, right sides together, and so that the edges intersect 1/4" from each point (right where your seam will be). This results in little triangles sticking out on each side. Make sure the triangles are showing and that they are even on each side.

5. Sew and press seam allowances open. Sew together a second pair and press.
6. Put your pairs together, right sides facing. Make sure the triangles are sticking out (again). Sew and press seam allowances open. You will now have a completed diamond. Repeat the steps above until you have 4 diamonds!
Ok, now the paper piecing!!! Don't panic this is really easy! You will see that I have sent you the paper piece patterns (4 sheets).
You will need to trim the edges so that you just have the square (see below):
7. Now it is time to attach one of the diamond units to the BACK of the template. (I line it up with a light to make sure it is in place. You points of the diamond will most likely be longer than the paper line for the diamond....this is ok).
You can use double stick tape or pins....I usually use the double stick tape but was out and the pins work just fine! When lining up the diamond unit on the template, you want to make sure that you have placed it correctly and that there will be 1/4" seam allowance all the way around. This diamond unit is piece #1 on the template.
8. Place a 3" x 6" background piece (Kona white) along the edge of the diamond that borders section #2. Make sure right sides facing and the edges are approximately lined up.
Now turn over the whole thing and sew on the line, through the paper. YOU SHOULD LOWER YOUR STITCH COUNT TO PERPORATE THE PAPER BETTER -- I USED 1.4.
Press back the piece you have just sewn.
9. Now you will add the next 3"x6" background piece to section 3 of the template.
Sew following the line for 3. Press open.
10. Now you will attach the "3x 9" strip to section 4 of the template.
Press the seams. Then you will add another 3"x9" to the last section on the template.
11. After you press it this is what your piece will look like. Now you will trim around the template.
Your first section is complete.....DO NOT REMOVE THE PAPER AT THE POINT.
Now repeat and complete 3 more sections. Once you have them completed you will sew two sections together :
MAKE SURE THAT THE BACKGROUNDS MATCH UP - YOU DON'T WANT A SHORT SECTION LINED UP WITH THE LONG SECTION. THE PICTURE ON THE ORIGINAL POST IS BETTER TO SHOW WHAT I AM TALKING ABOUT . MY PICTURE ISN'T THAT GOOD.
Sew the upper two sections together then sew the bottom two sections together. Now sew both sections together and you have a block that looks like this:
Once you have all 4 sections sewn together you can remove the paper from the back of the block.
I hope my directions are clear but if not, please go to the original post and maybe you can get clarification. I will be mailing out the fabric strips and paper templates on Monday (June 11th) so be looking for them and happy sewing everyone!!
Connie


 5. Sew and press seam allowances open. Sew together a second pair and press.